Wednesday, December 29, 2021

2021 Makes versus Plans!

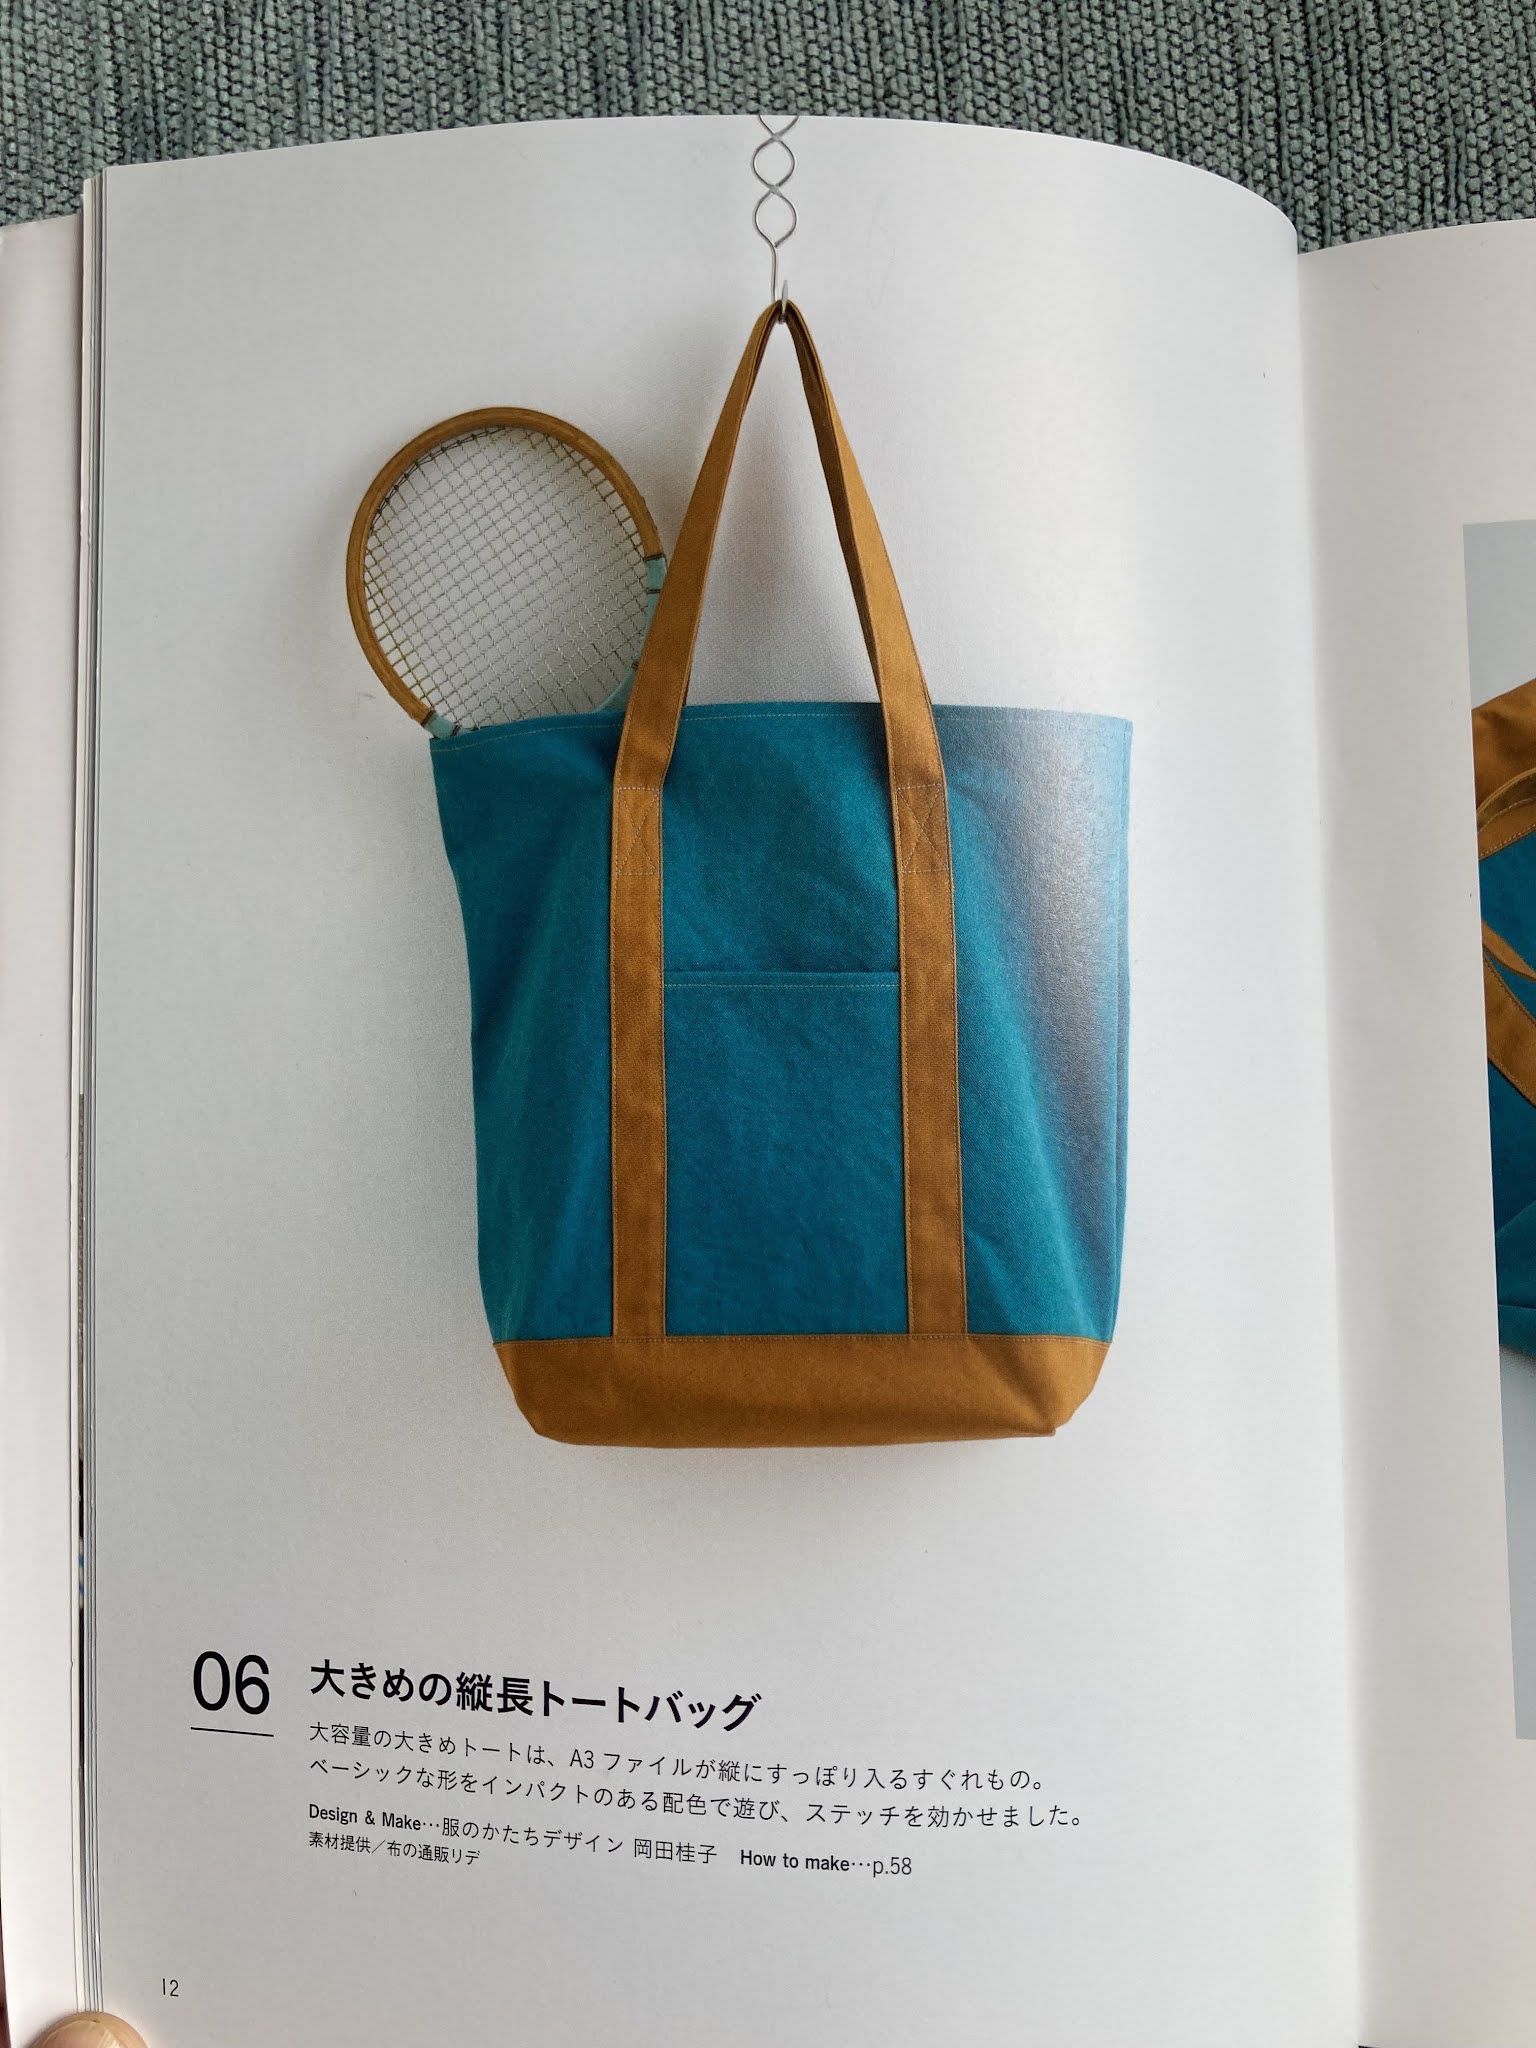
 At the start of this year I wanted to make 12 things. The idea was mainly clothes to wear, but also a bag. I wanted to reduce the fabric in my cupboard. Although I don't have a huge stash, I was somewhat overwhelmed by having material I had previously bought with big plans, only to have it sit in a box in my cupboard for, quite literally, years in some cases.

We have lived in our house for 5 years, and during this time there has been a gradual paring down of, well, 'stuff'. Part of living intentionally, wanting things to enhance my life, not engulf it. It has not been a dramatic Swedish Death Cleanse but a reflective process applied when energy permits.

So here was my plan.


So I executed 7 of these. The results were mixed.

(top row)

1 The Kingfisher top - still to get there. I have some silk but need ribbing. Then found I had a lot of ribbing but not quite the right solour. Then I found I had some scraps which might work, still might too - check in with me next year!

2 Ditto above for the Kobe top - so glad I bought both these patterns though because I am set (LOL)!!

3 Gingham checked shirt is as photographed. I am delighted with this. It is from a Japanese magazine purchased in Tokyo, Nippon Sewing district. On a rather hot 2019 day I lugged my purchases around; These included this red checked gingham and the 3 magazines I had bought and a lot of other fabric too. I have sewn up 4 pieces of fabric from that trip. I have worn this shirt a bit, so that feels good. I am a little wary of Japanese pattern sizing, but this did work. I may make it again. I think next time possibly a more drape in the fabric choice would be good.


4 The Kimono Top I have made before, including sorting some sizing issues. My first one was too large on the neckline which I adjusted mid-make. This orange one was made from a vintage table cloth. I confess I am not sure how wearable it is, but this summer will tell.

(row 2)

5 New Look 8536. This coat I have half cut out - then hit a snag, well I made a mistake. So I bundled it up and will look at it again one day. Given the fabric was some which I have had for at least 5 years, it will keep. 

6 Sewing Revival Snug Pants, I made in a striped cotton knit. These are my 2nd pair. I often live all day in my merino pair. Always need to remember to allow for a full calf adjustment, even in knit! I miss pockets in this pattern.

7 Capsule Trousers. I have a 3/4 made pair of trousers from the Capsule Wardrobe book. I am not sure I was thinking at all when I embarked on these, and they do need finishing. If I listen to Heather Lou's (Closet Core Patterns) pep talk I will get to the end and not focus on the fitting issues. My plan is to do an online course with Heather Lou for the next fitted pants make. So these did not make it over the line this year but they are not completely abandoned.

8 Friday Pattern Company V Neck Tee Shirt. I made two V-neck tee shirts, with this free pattern. In two different sizes. I was planning these would be for general in the garden and possibly tramping. The merino knit I used was way too fine. One shirt I managed a lovely finish on neckline, the other not so much. Chalk it up to learning, and for me buying fabric online does not produce the best outcomes.

(bottom row)

9 My Heron Shirt I am delighted with.


10 Morgan jeans pattern and online course purchased, fabric at the ready - this is getting bumped to 2022! Sewing jeans seems to be a 'big' project, but as this year has progressed and I have regularly spent more time sewing (13 weeks of lockdown helped) this has opened up the possibility of 'larger' projects.

11 The Sewing Revival Nikau dress was a success in Japanese linen. I am going to review the fit after reading a blog by Lucy and seeing how she made hers a little straighter. But it is in my wardrobe and in use, and who am I kidding that I will actually alter it!


12 Sidewinder Pants. I have a mixed relationship with the Sewing Revival Sidewinder Pants. I think largely my results have been due to fabric choices - put simply not enough drape, which is spelled out very clearly in the pattern instructions too I might add. I have already made 2 pairs, and neither worked exceptionally well. Then I tried these in a cotton, (I think) from The Fabric Store. I added the cuff after a couple of wears, but there is not enough drape and the bottom can look a bit romper like. The fabric tends to bag a bit after a wear, which means more washing and ironing than is my natural inclination. I am not giving up on this pattern though, I just need to select my fabric more carefully.


So there's the wrap! Time to look forward to the journey into 2022 and the makes it may contain . . . 

Claire

Legacy

Somewhere, on Instagram, or a sewing blog, or podcast there was mention of using up those ends of thread spools for basting. It was a small light bulb moment as I have a pile of those from my Mum.


There is something oddly pleasing about finishing these small tail ends. It appeals to my sense of thrift, as well as my ongoing desire to have less 'stuff'. Or more accurately to have things in my life which enhance it rather than weigh me down.

This trip into the drawer of assorted left over threads is also an opportunity to reflect on my mother's making life, and how she has influenced my making life - legacy.

Born just at the start of WWII my mother grew up in a small farming villlage, Ormond, just out of Gisborne in provincial New Zealand. Thrift was creative but it was also about getting by; nothing was wasted, much was kept for some future use or re-use.

Gran, my maternal grandmother was not a sewer although I recall Mum told me that she did knit socks and could turn a heel. There was  treadle Singer dewing machine in that house and I understand my mother and her sisters all sewed, by necessity I think. According to Mum one sister's work was carefully and very thoroughtly constructed, whilst the other sister left the house wearing dresses which, it could be argued, were unfinished. However this is only one view, and that Aunt has reassured me that her clothes never fell apart. (That sort of logic would appeal to the generation of young men in my house - why expend any more effort than is absolutely essential, but that is another story.)

My mother was a prolific maker across many fields. Sewer of clothes, for herself, my father my brother and me, of soft furnishings, table linen, countless pot mits and aprons, and quilts. A knitter of jerseys, hats and scarves. In the kitchen a preserver and chutney relish and jam maker. In the garden she was a sometime help mate in the vegetable garden, which was mainly my father's domain, but shared duties in the orchard pruning and harvesting. She also kept a large well maintained garden full of plants collected or grown from cuttings. Her home making skills extended to interior renovations, wall-papering and painting and, as often recalled by my father, she polyurethaned the entire corktile floor. She had her own Estwing woman's hammer, which I have inherited. She restored countless pieces of furniture, rescued from back rooms and sheds of her childhood home, as well as recovered from skip bins or discovered at the second hand mart. She also tried her hand at many a making trend, from macrame plant hangers, and basket making.

In the 2020 Auckland Writer's Festival Paula Morrison made a comment about her migrant English mother being slightly exasperated as the talents of the New Zealand housewife in the 1960's. 'They made everything'.  

I feel immensely grateful for my mother's model of a 'making life'. This also included making friendships which I can relate to. Those people who like to create are a vital part of growing and learning. I have special friends I have made at sewing classes, or with our hands in finger paint as Playcentre mums. These friendship foster my own creative pursuits, as well as spawning opportunities to try new ideas. Not surprisingly there are often many similarities we share about growing up with sewing and making mothers. I recall the delight in reminiscing with a friend about the novel containers our mothers made in the late 1970's. The bases were 2 litre icecream containers, holes punched around the upper rim, and a drawerstring bag attached, most likely in orange paisely or floral patterned fabric. In our house these were our 'camping toilet bags', in hers they were 'wet tog bags'.

Thinking back I am in awe of all the clothes she sewed for me, and my dolls. Wedding dress for my bride doll, dancing outfits, dresses, togs, the list goes on and on. If she were here now I would like to reflect on this huge body of work. 

I still have my Vogue Individualist  Claude Montana 1492 pattern, slightly tattered through much use, as a reminder of all those clothes. I remember the skirt, in a navy blue linen-like, the shirt, one in a deep teal but these were others, and the pants, made multiple times.


Although my parents never threw things away, which led to a mammoth job when I was clearing out their home of 50 years, Mum did in fact use a lot of these saved 'resources'. Thinking in particular about her sewing this would now be termed stash busting. Seems trendy these days but for my Mum this was a  habit of lifelong resourcefulness. Things were thoughtfully saved and stored. Scraps of fabric re-appears as pocket linings. And the thread, at the end of a project - the bobbin thread was carefully wound back onto the spool for use at a later date.

So there is a nice sense of connection as I use up these saved threads.

Claire, October 2021


Cheyenne Tunic in Rayon

 This is a garment which is inspired by a much worn, now retired due to tatty condition, favourite shirt. This is Hey June Cheyenne Tunic


Fabric

I was looking for a rayon or viscose, ideally in a geometric print, but I wanted to feel and purchase the fabric in store. And as I only went to one store that narrowed the options. The weight, drape and temperature of this fabric is really really lovely to wear. I am slightly suspicious of how it will wear with a few pin marks needing gentle pressing after construction. That said I did unpick a bit on the collar, and it has pressed up well.

The make:

After sewing a succession of very simple garments there was  a bit of hesitation on the scale of this shirt, and all the many pattern pieces. But once I began I enjoyed the process. I started with some of the smaller pieces, sewing the pockets and the sleeve tabs first, procrastinating and also getting a feel for the fabric before I tackled the front shaped half placket. This is evidence of smarter operating - why do so many patterns have you start on the centre front with the first seam.

The fit was fine, apart from adding 5cm to the body length. The sleeve length was OK but I must say once finished I am tempted to make them simpler next time. I think I will mainly wear them 3/4 length rolled up, so the work of the cuff and placket seem unecessary.

I found the directions of the front placket slightly tricky and I am still not sure of the final result. I see there is a sew along so I will research this before I sew this up again - which I plan to do 2022, maybe in a winter weight . . .

Claire

Sewing Self Care - Comfy Nightwear x 3

Much has been written about self care, and sewing, and the combination. But just for the record I agree.


This is a the True Bias Lodo Dress pattern. The idea was taken from Love, Lucy who wrote about using this pattern for nighties. (She has also documented a make that was inspired by seeing a fellow sewist's results. So I figure it might be OK to admit this is where the idea came from.) As a latecomer to the online sewing community and indie patterns, I do rather like having this connection with the pattern designer.

The striped fabric was from The Fabric Store and was an online purchase I made in a flurry in 2020. I was planning to make a pair of pants and bought 2 pieces of striped cotton knit. I have made one pair into The Sewing Revival Snug Pant. It was lighter weight than this, and on reflection this knit is 'winter' weight.

This is S14, it is very comfortable in bed! I also loved that little bit of extra length, slightly more cosy.

My first True Bias Pattern. It is a very simple design and the woven facings will no doubt help this garment throught the rigours of night wear and a fast rotation through the washing machine.


I am enjoying the chance to pivot, see an idea, grab some fabric and sew. It is also nice to be able to fill a wardrobe gap with such ease - I ditched a couple of nighties recently and the remainder on rotation are also looking, frankly, a bit shabby.

On a roll I have made 2 more Lodo nighties, both in S12. One is a cotton knit, the other a rayon, both from Spotlight. I love the feel of the rayon knit to sleep in and it is slightly cooler than the cotton. So much fun to sew, and fun prints I like. 

It is tempting to plan to replenish my supplies. Especially after such a productive time of Lockdown Sewing.  As I began to write this we were going to be able to actually visit fabric stores, in person, after 3 months of lockdown restrictions. I always look forward to some purposeful browsing with my list of want-to-makes, to feel the weight touch and drape of some options. But I rather hope too that I will be sufficently disciplined. My aim is to be sewing fabric I am still in the first flush of love with.  To have some clear space to make connections, lean enough stock to have creative ideas. To be considerate towards future me, that I might be able to buy material in the future which reflects sewing I want to do then - and right now I do not know what that may be.

Claire

December 2021

Monday, December 6, 2021

Nikau Dress by Sewing Revival

 This is another pattern by Kiwi designer Sewing Revival. Easy to sew, and also easy to wear.


I made size M and added to 5cm the length - usually necessary as I am 5'9" (at least I was, and still identify with this height!).

The fabric was purchased in Tokyo 2019, a light weight linen. This is a simple dress. There were two belt version, one wider but I went for the narrow one. I think the wider would be more of a feature. On the reverse of my belt I used another Japanese linen for a little twist of contrast.

The instructions and construction are fairly straight forward. Will I make it again? Not sure. The neckline is not a favourite, but I realise now I could hack this too, although to what I am not sure. I would recommend this pattern though for a simple summer make.

(Excuse the lock-down hair, 4 months since last haircut, 9 days to go til hairdresser appointment!)

Claire 

2021


Wednesday, December 1, 2021

My Faithful Bernina Nova 900

My faithful workhorse of a machine, the 1982 Bernina Nova, was a 21st birthday present in 1987. 


Before then I was using my mother's hand me down Bernina, which was, to my recollection, also a perfectly fine machine. The highpoint for me with that machine was sewing a dress for my first year Ball at University. I recall this very well as I ended up constructing two bodices. Both were well made, the first just 3 inches too short!

My 'current' machine was bought second hand from the local Bernina dealer in my home town Gisborne, New Zealand. My mother made the decision and purchase. She was very familiar with this model as she herself has bought herself a brand new one several years before.

So this machine has been in my life for more than 30 years. I confess there have been times I have considered upgrading, but now, I think we've made it this far it's probably a keeper.

At one time a fancier and newer model caught my eye with it's automatic button hole program. The 1982 Nova does have this feature but it sews the second bead in reverse, and the finish is not quite as good as the modern programing which makes both beads sewn forward with a tighter satin stitch finish. But, seriously, when a garment is complete and makes it into the wardrobe, who ever looks at the quality of the button holes. When I had these thoughts I was doing some sewing classes, one of which was making a tailored jacket - I wanted a keyhole style button hole. Again beyond the level of my machine. But at that time (late 1990's Auckland, New Zealand), I found somewhere that did these button holes, 50 cents each. Sad to think that 25+ years on I don't think this place would be existence.

More recently I did crave three stitch long zigzag stitch option which my faithful Nova does not do. This was likely for some quilting style project. Anyway, given that now I struggle to remember the exact details, the conclusion is we got through this period of unrest! I suspect this machine will be with me for life. 

As you would expect with a machine of it's vintage, we do run into a few problems. But my reliable, no-nonsense machine service man tells me for my machine we have fixed the top three issues so maybe all that behind us. I love the way the foot pedal offers brilliant speed control, literally a stitch at a time.

Curiously. I did end up with my mother's machine as well. Unfortunately it suffered one of the common age-related problems for for this model, the foot pedal either didn't go at all, or it went hell for leather. It was quietly put out to pasture. Actually it was donated to Ribbon Rose who said they could use it for parts. They support new sewers in South Auckland, and I do hope there were some parts which were useful and may be launching a sewer on their way our there.

Claire

October 2021


Tuesday, November 9, 2021

A Pouf of Fun

In the 11th week of covid lockdown restrictions, routines for self care have evolved. My wonderful sewing room, refered to as Tairawhiti after my home whenua, has been a blessing. The main risk here is I may actually sew up all my 'stash'!

But the extra time in this space means I can fly off on tangents, and follow an idea through, with materials on hand, just like that. 


The Closet Core pouf came about as I finished making a pinafore. When I photographed it and looked at all my other recent makes, everything seemed to be in quite dull colours. The perfect antidote to that restrained wardrobe palate is some colourful mix and match!

The fabrics here were a collection of leftovers from various home furnishing projects, cushions in particular. Plus random saved pieces; the cut off legs from husband's shortened cargo pants, and a treasured linen tea towel discovered in an op shop long ago and carefully stowed - that is the lovely birds, enough for two pieces on the top, and one side panel.

Fun and fast construction. Challenging to line up the points. An opportunity to use my newest sewing room tool - a piece of dowel on the pressing table.

The end result is not yet stuffed with fabric scraps - I don't have enough! Instead old towels and assorted random linen do the trick for now, giving it a decidedly lumpy shape. Still works a treat.

Claire 

Sunday, October 24, 2021

Ivy Pinafore - All About Process and Fit

Once again it delights me to sew up a New Zealand designed Indie Sewing Pattern. This is the Ivy Pinafore by Jennifer Lauren Handmade.


Some of the things I wish to make are better or different versions of current wardrobe staples, which is the case here. I have two pinafores which I find very easy work wear. Sometimes a dress is a bit of a commitment. I will put it out there and say when you are tall, I am 5'9", a dress can be a lot of one fabric. A layer underneath breaks it up. At least that is my thinking. My current pinafores are both winter weight, and were both recycle finds. This one is from New York making it all the more special.


I did some research and thought this pattern would be a good start. I used fabric from The Fabric Store, a fine suiting with some stretch, and a striped lining.


Fitting. I am coming to realise how little attention I have paid to fitting in pretty much all my sewing. Sure I have consistently added length, but little else. For years I sewed mainly Vogue patterns - remember those half price pattern sales - and the results worked well enough for me not to have to drill down into any detail. But entering the world of online pattern reviews, and the wealth of resources online opens up space to make better fitting clothes - well that is the current goal. 


Confession - I have never made a toile or muslin, and realistically I do not think I ever will. I took a series of sewing classes in the early 1990s where our teacher, Judith Whyman, taught us to measure our bodies, and check that against the pattern pieces - that made sense to me. 

Reading some online reviews about the Ivy there were comments about it being full in the bust. I was concerned, I am a B cup, so I asked Jennifer Lauren herself. She helpfully considered my measurements and advised I would probably be OK. 

Then I graded from a size 12 to a size 14 at the bottom and added 20 centimetres to the length. If that sounds like a lot of extra length, it was, too much. What was I thinking? The pattern gave be a finished measurement from the underarm. In the end I cut off about 10cm before hemming - lesson there. 

I am not sure why I decided I needed a size 14 from the waist down as my hip measurement put me in a size 12.

Process. It is helpful now to write onto the instructions the point at which I will stop and baste and try on. In this case that was after attaching the front and back neckbands. The top fit was perfect, whilst the bottom was sack like! You know I find it easy to feel this is a stuff up; having to unpick and resew, well it feels like I have made a mistake. I am trying to re-frame this into a natural part of the process.

The pattern goes together quite simply. The instructions are clear. I did wonder about he need for a centre front seam and possibly I would omit that next time. This garment does have the stressful final step of button holes in a very prominent position. Not to mention the choice of buttons! I found something in my collections, and talked myself through the decision with the proviso that I can always change them later!

Claire

Saturday, October 23, 2021

Agustina Boxy Top Miracle

 As I spend more time immersed in the online sewing community I am delighted to find solutions to my wardrobe conundrums. This top is one such example.


Short version. I have re-worked a me-made top, plus the saved left over fabric, with this free Agustina Boxy Top pattern from the Fabrics-Store.com. Perfect extra layer, with wide armholes to accommodate all types of sleeves, blousy and fitted. Yet not too long or bulky so I can still add a jacket for my walk to work. The neckline is high enough to give structure, scooped enough to allow some detail to show through. The length is designed to likewise allow a little pop of interest.


And, if you are interested, here is the long version. 

(Long verions like this alway make me think of Melanie Griffith's character in the lift in the 1988 movie Working Girl. Tess McGill had that lift ride to explain the genesis of her merger idea. The story of course proves that it was her creative mind which hatched the idea, not her boss (played by Sigourney Weaver) who had shamelessly stolen it!)

Since picking up more sewing I have been thinking about my wardrobe. I was captivated by Karen Templer's sharing of her capsule wardrobe photos and plans, but also by her vests. These seemed a perfect way to extend and mix and match, plus the practical additional warmth of an extra layer. Only they are all knitted, and I am still trying to finish a pair of socks which have been on the needles for about 2 years. 

I tried to find a sewing pattern. This including drafting the Amara vest pattern. But the hurdle there was fabric. Reviews have shown this sewn in heavier or bulkier looking fabric than appealed to me.

My new plan was to knit a Holiday Slipover - although aware this was no small undertaking, and definitely on the long term plan list! I like the large armholes which will accommodate all manner of sleeves.

Then I saw Instagram posts by Teresa Hardy @desewtropia of this Agustine Top - doing everything I wished for. Her fabric selection was not bulky but added interest.

My fabric here is another story. Some decades ago I purchased fabric at Cushla's in Devonport. I acquired a loyalty card, and qualified for some amount off a future purchase. Gorgeoous shop I recall, but completely out of the way for me. A special trip was needed and I bought this fine knitted textured fabric. No plans at that time and limited experience of sewing knit fabric. Result - into the stash for storage for literally years. It has rather haunted me so I found a wrap pattern in a Japanese magazine I had, and deliberately did not dwell on it, just cut it up and sewed it. I wore it a few times. It did add warmth, but I was never happy with the back, a drape turned to a sag. It reminded me of a similarly unsuccessful Paper Cut circle top which I no longer have. On a 'shrug' the armholes have to be small enough to grip and keep the garmet on, while the round opening is prone to slipping off the shoulder.


Construction for this top did involve first cutting a large, then once basted and tried on, taking it back to a size M. It is as the name suggests, a boxy top. Depending on the stretch of future fabric I might take it in a little more.

It was exciting to cut it up and start again. Albeit with some zero waste challenges to fit the top out. I am pleased with the result and think it will be handy. And possibly not the last one of these I make.

Claire

Thursday, October 7, 2021

The Maker's Atelier Origami Top

 It has been a bit of a journey with this top. I suspect I am going to get a fair amount of wear out of it - easy to team with pants and skirts, and in green, a colour I love to wear. But putting it together was an experience.


The Fabric: This is a fine jersey knit which was in my stash. It is green, and I have no idea where it came from. Let me tell you I don't have a huge stash after a bit of a push to make things up, plus a few year's back taking a load of fabric to release at a Fabric-a-brac event in Auckland. So I would have thought nothing in there was older than 5 years - yet this is still a mystery.

The fine springy nature of this fabric scared me. 

The Pattern: The Maker's Atelier aesthetic is beautiful and the pieces all look like things which would be very comfortable to wear, and look great. 

In theory this pattern was simple, three pieces. The instructions, I thought, were scant and also lacked options to get a nice finish. They suggest leaving the neck edge and hem raw. Which I find a little bit odd. Yet there is detail about how to sew on the label - which I did not get as I ordered a digital pattern.

I had to look up the sizing on the website, which was a bit of a pain, and there were no finished measurements anywhere to be found.

I have made, and written about, the Tie Front Blouse from The Essential Collection book, so it should not have been a surprise to find the size 14 I made was very roomy, in fact tent like, in the body. And the sleeves were, well, skinny. Here it is at that point.


I should have basted the pattern up! But I was so keen to tackle the scary stitching on my overlocker, and insert the clear elastic to stabilise the shoulders, I just launched straight in. Lesson learned. So I carefully cut off all the seams, except the sleeve seam. Then I trimmed the front and back pieces, then basted, then sewed it up - phew!

I am happy with the result. I hand stitched the neck edge and lower hem. It took a while but it was quite easy to get a nice finish. For the sleeves I used the zig zag on my regular sewing machine (Bernina Nova circa 1982). The centre front is going to pop out slightly, which lends it to being tucked in.


Interestingly it did not occur to me to search out reviews or write ups for this top until I was about to start sewing. I found two reviews, neither were fans. 

I had fancied the Drawstring-neck top and the Tie Detail top, also by this designer. And I surprise myself at my willingness to overlook these experiences and be thinking they could still work. . . . But I am going to learn from this top and move on. My goal for my sewing is to make clothes which both fit and are comfortable to wear.

Claire

Monday, October 4, 2021

Palisade Pants

Not one pair of Palisades, but two.

The first in a linen from the Fabric Store. Loved the feel of this and I really did think it had some drape. 


I sewed S14 based on my hip measurements. I added 5cm to the leg length. Then, for the first time I actually basted these up and tried them on. 


It was tricky to get the top to stay cinched in to evaluate the fit. Length and crotch seemed fine, but they were tight on the calf. How did I forget about my full calves! The pattern has a 1cm seam allowance, so I skinnied that up on the lower leg, and the result was fine. I sewed on until I needed to stop and wait for the elastic I ordered online.

I was doing this project during a Covid-19 Lockdown, so had time to kill while I waited for the leastic to show up. I wanted to keep sewing, hence the second pair. This is a lighter weight fabric from my stash, which I acquired at a fabric swap in Matakana earlier this year. I honestly just went to look, not come home with anything, but you know how it goes. This was labeled 150cm x 150cm, in a brown colour with a bit of a sheen, and also a small degreee of stretch.


For the second pair it was a chance to make a full calf adjustment to the pattern plus I added a little onto the side panel back seam for the lower leg, just to be safe. The restul is good on the lower leg.

It was interesting to baste the pattern up - an opportunity to use some random thread. It required me to abandon the assembly order described in the instructions - actually I did find this hard! It turns out I am a rule follower, if there is a prescribed order then I like to do that.

Fitting evaluation on the second pair was the leg width was good - no clinging to my calves, but the bottom felt a little snug. Again hard to tell when trying to tuck the raw edge into a sash belt, but enough to make me let out the seams by a little.

I changed the construction a little, and attached the entire band then inserted the elastic. I find it very hard to get elastic right, having learned from experience it is useful to safety pin the elstic in at the proposed length, then wear the pants around for an hour to try it out. Usually I make it shorter/tighter as a result. I was pretty sure that inserting the elastic into the back band, as per the pattern instructions, would mean unpicking and tweaking. I also reduced the width of the band, to 4cm finished - liked the result. 

Results:

The linen pair are comfortable to wear and I am happy with how they hang. Possibly slightly long but that is a good probelm for me. A reminder to keep them up on the waist, and I made sure the elastic was reasonably firm. I wished afterwards that I had lined the pockets with a lighter weight cotton. I trimmed carefully before finishing the front and back centre leg seams, to try to reduce the bulky edges of the pockets.

For the pockets I have made both pairs with only one diagonal pocket. It just didn't make sense to add more fabric at the hip. I am pleased with the line on this.

The flat front band I like - similar to The Sewing Revival Sidewinder pants. I wish I could work out how to make the elasticated portion of the band look less home made?

I liked the finish on the fabric on the second pair. The fit is snug, and I do hope the construction is all sound.

Exciting to have some bottom halves completed. I'm undecided about the side pockets. I am pretty sure these will never be used, and I am not inclined to repeat this pattern at this stage. Instead I am looking forward to trying the Free Range slacks, with pockets front and back pockets and a smooth side panel - watch this space.

Claire

Saturday, October 2, 2021

The Maker's Atelier Tie Front Blouse

 I loved this striped vicose georgette fabric from The Fabric Store and its weight and body were good to sew with. 

The pattern is from Frances Tobin's book The Maker's Atelier, The Essential Collection.


There is much to love about this collection of patterns and the pieces in the book are stunningly executed. It felt both exciting and a bit risky to be drafting this pattern from the back of a library book.


The pattern and construction were fairly straight forward. I made S1/2. I was highly suspicious of the sleeve head size - after I had cut it out! I wondered how my arms would move in this garment as the top of the sleeve appears too skinny. It does work and is comfortable across the back to wear, but this is due to the ‘relaxed’ fit. For me this can feel a little big and loose. If I make this again I figure perhaps I would take some of the width out? Or look for another pattern? The front sat slightly lower than I usually like to wear but I am confident I could adjust that for future makes.

The stripes are helpful for cutting and sewing although I did make a mistake when hemming and the lower front edges are uneven. I do honestly, intend to fix this some time. But I made the fateful move of putting it into the wardrobe and wearing it, so I am not sure when I will get back to adjust this. I also, kind of like this uneven hem, evidence of its maker.

I have the Origami top, also from The Maker’s Atelier, in my making pile and look forward to trying another pattern from this designer.

Claire

Orla Kiely Work Bag

 What a delight to have finally made this much awaited work bag.


The Orla Kiely oil cloth remnant was from The Fabric Store some time back. . . .

The bag is capacious, to fit all I need to carry on my walk to and from work. This includes usually, lunch, a change of shoes, umbrella, plus other bits and bobs.


The contrast fabric is from our local Geoff's Emporium in Warkworth - thermal backed curtain fabric. I like the colour match although is it not a waterproof fabric. The straps were a colour matched webbing, slightly narrower than ideal, so I added a layer of the contrast to this - more comfortable on the shoulder and to carry.


I followed a bag pattern from this Japanese sewing book, purchased in Tokyo in 2019. I have made another earlier attempt. This was not successful in terms of the fabric choice - too soft, the size - too small, and the handles - too wide and too short. Good learning though.


I listened to the Love 2 Sew podcast interview with bagmaker Anna Graham. My main takeaway was there will be awkward tricky bits when sewing bags with oil cloth - just take it slow and keep going. Turned out to be good advice. 

There were a few revelations - usually I figured out a better method after I had done somethings. My key learning was the webbing does not need to be hemmed, just melt the cut end on a flame.

Claire

Saturday, September 25, 2021

Heron Top in Silk Georgette

It has been a while since I was here in this blog space, but some recent output at the sewing machine, along with reading some wonderful sharing of other sewists has led me back.

I have just finished this Heron Shirt in silk georgette from The Fabric Store.

I have two RTW shirts in similar styles, both of which don't quite work for a variety of reasons. The rust peasant style is a great colour and size, but short sleeves and slightly tight elastic cuffs are annoying - I am 5'9" and usually want more length in the body and sleeves. Plus the polyester fabric is very clingy. 

I like this silk top, but have sewn up the centre front slightly, and also find these sleeves short.

I bought this georgette fabric online, on an impulse, and since then it has sat in the cupboard scaring me. Finally I took the plunge.

First step was the treat the fabric with gelatine. This worked well to stabilise it. Something to consider though when looking at the fit toward the end of sewing, as the shoulders sat up slightly. Then once I washed the gelatine out it draped much better.

I listened to the Love 2 Sew episode on sewing delicate fabrics as I began this project, and the advice was very useful, especially to be patient.

I made a size 12 (NZ/AU/UK) adding 5cm to the body length and the sleeve based on my measurements. Turns out I didn't I need to do this so in the end shortened the sleeves only once they were completely finished. And shortened the body too but fortunately before I had finished the hem. 

As a Kiwi sewist I am so happy to be making a Made in NZ pattern. I love the style and feel of most of the Sewing Revival range and I have made the Nikau and Fernbird dresses, as well as Snug and Sidewinder pants. 

The simplicity of the pattern - only 3 pieces, front, back & sleeve - was pleasing. I think I will make this again, possibly in a weightier fabric with more drape. Next time though I will not start with the centre front seam. Instead I will dive further in and sew the sleeves and back first to warm up. I ended up unhappy with the way the centre seam was sitting so unpicked the seam and the hemmed edges - stich by stitch - and redid it. Happier with the result.

I will also make a slightly more generous channels for the elastic/ tie at the neck edge - gave myself conniptions pulling the tie through my delicate fabric on this one.

Reflecting on my process with this garment, I was sewing a delicate fabric which I don't have a lot of experience with. As a rule I don't make toilles, preferring to measure the pattern pieces, myself, and other similar garments I already own. But this is not unfalliable. From here on I have promised myself to try things on earlier and more often in my sewing process. I smile to see my approach, follow instructions through to the end, then out the garment on and wear. For this pattern it is really hard to gadge the fit and sizing until the neck is complete. So a sensible path would be to apply my experience and learning to making another Heron. 

Claire