Sunday, October 24, 2021

Ivy Pinafore - All About Process and Fit

Once again it delights me to sew up a New Zealand designed Indie Sewing Pattern. This is the Ivy Pinafore by Jennifer Lauren Handmade.


Some of the things I wish to make are better or different versions of current wardrobe staples, which is the case here. I have two pinafores which I find very easy work wear. Sometimes a dress is a bit of a commitment. I will put it out there and say when you are tall, I am 5'9", a dress can be a lot of one fabric. A layer underneath breaks it up. At least that is my thinking. My current pinafores are both winter weight, and were both recycle finds. This one is from New York making it all the more special.


I did some research and thought this pattern would be a good start. I used fabric from The Fabric Store, a fine suiting with some stretch, and a striped lining.


Fitting. I am coming to realise how little attention I have paid to fitting in pretty much all my sewing. Sure I have consistently added length, but little else. For years I sewed mainly Vogue patterns - remember those half price pattern sales - and the results worked well enough for me not to have to drill down into any detail. But entering the world of online pattern reviews, and the wealth of resources online opens up space to make better fitting clothes - well that is the current goal. 


Confession - I have never made a toile or muslin, and realistically I do not think I ever will. I took a series of sewing classes in the early 1990s where our teacher, Judith Whyman, taught us to measure our bodies, and check that against the pattern pieces - that made sense to me. 

Reading some online reviews about the Ivy there were comments about it being full in the bust. I was concerned, I am a B cup, so I asked Jennifer Lauren herself. She helpfully considered my measurements and advised I would probably be OK. 

Then I graded from a size 12 to a size 14 at the bottom and added 20 centimetres to the length. If that sounds like a lot of extra length, it was, too much. What was I thinking? The pattern gave be a finished measurement from the underarm. In the end I cut off about 10cm before hemming - lesson there. 

I am not sure why I decided I needed a size 14 from the waist down as my hip measurement put me in a size 12.

Process. It is helpful now to write onto the instructions the point at which I will stop and baste and try on. In this case that was after attaching the front and back neckbands. The top fit was perfect, whilst the bottom was sack like! You know I find it easy to feel this is a stuff up; having to unpick and resew, well it feels like I have made a mistake. I am trying to re-frame this into a natural part of the process.

The pattern goes together quite simply. The instructions are clear. I did wonder about he need for a centre front seam and possibly I would omit that next time. This garment does have the stressful final step of button holes in a very prominent position. Not to mention the choice of buttons! I found something in my collections, and talked myself through the decision with the proviso that I can always change them later!

Claire

Saturday, October 23, 2021

Agustina Boxy Top Miracle

 As I spend more time immersed in the online sewing community I am delighted to find solutions to my wardrobe conundrums. This top is one such example.


Short version. I have re-worked a me-made top, plus the saved left over fabric, with this free Agustina Boxy Top pattern from the Fabrics-Store.com. Perfect extra layer, with wide armholes to accommodate all types of sleeves, blousy and fitted. Yet not too long or bulky so I can still add a jacket for my walk to work. The neckline is high enough to give structure, scooped enough to allow some detail to show through. The length is designed to likewise allow a little pop of interest.


And, if you are interested, here is the long version. 

(Long verions like this alway make me think of Melanie Griffith's character in the lift in the 1988 movie Working Girl. Tess McGill had that lift ride to explain the genesis of her merger idea. The story of course proves that it was her creative mind which hatched the idea, not her boss (played by Sigourney Weaver) who had shamelessly stolen it!)

Since picking up more sewing I have been thinking about my wardrobe. I was captivated by Karen Templer's sharing of her capsule wardrobe photos and plans, but also by her vests. These seemed a perfect way to extend and mix and match, plus the practical additional warmth of an extra layer. Only they are all knitted, and I am still trying to finish a pair of socks which have been on the needles for about 2 years. 

I tried to find a sewing pattern. This including drafting the Amara vest pattern. But the hurdle there was fabric. Reviews have shown this sewn in heavier or bulkier looking fabric than appealed to me.

My new plan was to knit a Holiday Slipover - although aware this was no small undertaking, and definitely on the long term plan list! I like the large armholes which will accommodate all manner of sleeves.

Then I saw Instagram posts by Teresa Hardy @desewtropia of this Agustine Top - doing everything I wished for. Her fabric selection was not bulky but added interest.

My fabric here is another story. Some decades ago I purchased fabric at Cushla's in Devonport. I acquired a loyalty card, and qualified for some amount off a future purchase. Gorgeoous shop I recall, but completely out of the way for me. A special trip was needed and I bought this fine knitted textured fabric. No plans at that time and limited experience of sewing knit fabric. Result - into the stash for storage for literally years. It has rather haunted me so I found a wrap pattern in a Japanese magazine I had, and deliberately did not dwell on it, just cut it up and sewed it. I wore it a few times. It did add warmth, but I was never happy with the back, a drape turned to a sag. It reminded me of a similarly unsuccessful Paper Cut circle top which I no longer have. On a 'shrug' the armholes have to be small enough to grip and keep the garmet on, while the round opening is prone to slipping off the shoulder.


Construction for this top did involve first cutting a large, then once basted and tried on, taking it back to a size M. It is as the name suggests, a boxy top. Depending on the stretch of future fabric I might take it in a little more.

It was exciting to cut it up and start again. Albeit with some zero waste challenges to fit the top out. I am pleased with the result and think it will be handy. And possibly not the last one of these I make.

Claire

Thursday, October 7, 2021

The Maker's Atelier Origami Top

 It has been a bit of a journey with this top. I suspect I am going to get a fair amount of wear out of it - easy to team with pants and skirts, and in green, a colour I love to wear. But putting it together was an experience.


The Fabric: This is a fine jersey knit which was in my stash. It is green, and I have no idea where it came from. Let me tell you I don't have a huge stash after a bit of a push to make things up, plus a few year's back taking a load of fabric to release at a Fabric-a-brac event in Auckland. So I would have thought nothing in there was older than 5 years - yet this is still a mystery.

The fine springy nature of this fabric scared me. 

The Pattern: The Maker's Atelier aesthetic is beautiful and the pieces all look like things which would be very comfortable to wear, and look great. 

In theory this pattern was simple, three pieces. The instructions, I thought, were scant and also lacked options to get a nice finish. They suggest leaving the neck edge and hem raw. Which I find a little bit odd. Yet there is detail about how to sew on the label - which I did not get as I ordered a digital pattern.

I had to look up the sizing on the website, which was a bit of a pain, and there were no finished measurements anywhere to be found.

I have made, and written about, the Tie Front Blouse from The Essential Collection book, so it should not have been a surprise to find the size 14 I made was very roomy, in fact tent like, in the body. And the sleeves were, well, skinny. Here it is at that point.


I should have basted the pattern up! But I was so keen to tackle the scary stitching on my overlocker, and insert the clear elastic to stabilise the shoulders, I just launched straight in. Lesson learned. So I carefully cut off all the seams, except the sleeve seam. Then I trimmed the front and back pieces, then basted, then sewed it up - phew!

I am happy with the result. I hand stitched the neck edge and lower hem. It took a while but it was quite easy to get a nice finish. For the sleeves I used the zig zag on my regular sewing machine (Bernina Nova circa 1982). The centre front is going to pop out slightly, which lends it to being tucked in.


Interestingly it did not occur to me to search out reviews or write ups for this top until I was about to start sewing. I found two reviews, neither were fans. 

I had fancied the Drawstring-neck top and the Tie Detail top, also by this designer. And I surprise myself at my willingness to overlook these experiences and be thinking they could still work. . . . But I am going to learn from this top and move on. My goal for my sewing is to make clothes which both fit and are comfortable to wear.

Claire

Monday, October 4, 2021

Palisade Pants

Not one pair of Palisades, but two.

The first in a linen from the Fabric Store. Loved the feel of this and I really did think it had some drape. 


I sewed S14 based on my hip measurements. I added 5cm to the leg length. Then, for the first time I actually basted these up and tried them on. 


It was tricky to get the top to stay cinched in to evaluate the fit. Length and crotch seemed fine, but they were tight on the calf. How did I forget about my full calves! The pattern has a 1cm seam allowance, so I skinnied that up on the lower leg, and the result was fine. I sewed on until I needed to stop and wait for the elastic I ordered online.

I was doing this project during a Covid-19 Lockdown, so had time to kill while I waited for the leastic to show up. I wanted to keep sewing, hence the second pair. This is a lighter weight fabric from my stash, which I acquired at a fabric swap in Matakana earlier this year. I honestly just went to look, not come home with anything, but you know how it goes. This was labeled 150cm x 150cm, in a brown colour with a bit of a sheen, and also a small degreee of stretch.


For the second pair it was a chance to make a full calf adjustment to the pattern plus I added a little onto the side panel back seam for the lower leg, just to be safe. The restul is good on the lower leg.

It was interesting to baste the pattern up - an opportunity to use some random thread. It required me to abandon the assembly order described in the instructions - actually I did find this hard! It turns out I am a rule follower, if there is a prescribed order then I like to do that.

Fitting evaluation on the second pair was the leg width was good - no clinging to my calves, but the bottom felt a little snug. Again hard to tell when trying to tuck the raw edge into a sash belt, but enough to make me let out the seams by a little.

I changed the construction a little, and attached the entire band then inserted the elastic. I find it very hard to get elastic right, having learned from experience it is useful to safety pin the elstic in at the proposed length, then wear the pants around for an hour to try it out. Usually I make it shorter/tighter as a result. I was pretty sure that inserting the elastic into the back band, as per the pattern instructions, would mean unpicking and tweaking. I also reduced the width of the band, to 4cm finished - liked the result. 

Results:

The linen pair are comfortable to wear and I am happy with how they hang. Possibly slightly long but that is a good probelm for me. A reminder to keep them up on the waist, and I made sure the elastic was reasonably firm. I wished afterwards that I had lined the pockets with a lighter weight cotton. I trimmed carefully before finishing the front and back centre leg seams, to try to reduce the bulky edges of the pockets.

For the pockets I have made both pairs with only one diagonal pocket. It just didn't make sense to add more fabric at the hip. I am pleased with the line on this.

The flat front band I like - similar to The Sewing Revival Sidewinder pants. I wish I could work out how to make the elasticated portion of the band look less home made?

I liked the finish on the fabric on the second pair. The fit is snug, and I do hope the construction is all sound.

Exciting to have some bottom halves completed. I'm undecided about the side pockets. I am pretty sure these will never be used, and I am not inclined to repeat this pattern at this stage. Instead I am looking forward to trying the Free Range slacks, with pockets front and back pockets and a smooth side panel - watch this space.

Claire

Saturday, October 2, 2021

The Maker's Atelier Tie Front Blouse

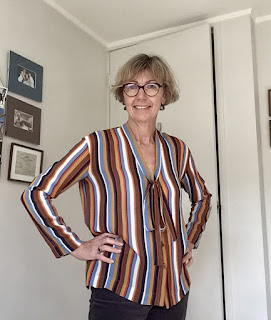
 I loved this striped vicose georgette fabric from The Fabric Store and its weight and body were good to sew with. 

The pattern is from Frances Tobin's book The Maker's Atelier, The Essential Collection.


There is much to love about this collection of patterns and the pieces in the book are stunningly executed. It felt both exciting and a bit risky to be drafting this pattern from the back of a library book.


The pattern and construction were fairly straight forward. I made S1/2. I was highly suspicious of the sleeve head size - after I had cut it out! I wondered how my arms would move in this garment as the top of the sleeve appears too skinny. It does work and is comfortable across the back to wear, but this is due to the ‘relaxed’ fit. For me this can feel a little big and loose. If I make this again I figure perhaps I would take some of the width out? Or look for another pattern? The front sat slightly lower than I usually like to wear but I am confident I could adjust that for future makes.

The stripes are helpful for cutting and sewing although I did make a mistake when hemming and the lower front edges are uneven. I do honestly, intend to fix this some time. But I made the fateful move of putting it into the wardrobe and wearing it, so I am not sure when I will get back to adjust this. I also, kind of like this uneven hem, evidence of its maker.

I have the Origami top, also from The Maker’s Atelier, in my making pile and look forward to trying another pattern from this designer.

Claire

Orla Kiely Work Bag

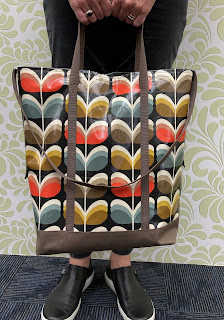
 What a delight to have finally made this much awaited work bag.


The Orla Kiely oil cloth remnant was from The Fabric Store some time back. . . .

The bag is capacious, to fit all I need to carry on my walk to and from work. This includes usually, lunch, a change of shoes, umbrella, plus other bits and bobs.


The contrast fabric is from our local Geoff's Emporium in Warkworth - thermal backed curtain fabric. I like the colour match although is it not a waterproof fabric. The straps were a colour matched webbing, slightly narrower than ideal, so I added a layer of the contrast to this - more comfortable on the shoulder and to carry.


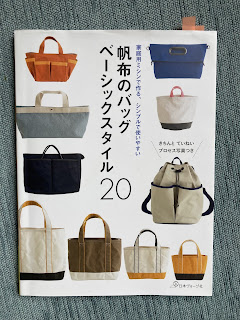
I followed a bag pattern from this Japanese sewing book, purchased in Tokyo in 2019. I have made another earlier attempt. This was not successful in terms of the fabric choice - too soft, the size - too small, and the handles - too wide and too short. Good learning though.


I listened to the Love 2 Sew podcast interview with bagmaker Anna Graham. My main takeaway was there will be awkward tricky bits when sewing bags with oil cloth - just take it slow and keep going. Turned out to be good advice. 

There were a few revelations - usually I figured out a better method after I had done somethings. My key learning was the webbing does not need to be hemmed, just melt the cut end on a flame.

Claire